Search This Blog

2017/12/30

Node.js looping through 2-dimensional jagged array

consider following jagged array structure which is place holder for routing data collected to to organize express routing details

var sample = {
    'get': [
        ['api/spaceships', 'get all'],
        ['api/spaceships/:id', 'get filtered list']
    ],
    'post': [
        ['api/spaceships', 'get all'],
        ['api/spaceships/:id', 'get filtered list']
    ]
}

javascript code below will loop through and print values

Code:
    console.log('-------------------------------------------------');
    for (var j = 0; j < Object.keys(sample).length; j++) {
        console.log('HTTP Method :' + Object.keys(sample)[j]);
        for (var i = 0; i < sample[Object.keys(sample)[j]].length; i++) {
        console.log('-----------Route--------------------');
        console.log('Key:' + sample[Object.keys(sample)[j]][i][0]);
        console.log('Value:' + sample[Object.keys(sample)[j]][i][1]);
        console.log('-----------Route--------------------');
        }
        console.log('-----------Next Iteration---------------------');
    }


Output:

    -------------------------------------------------
    HTTP Method :get
    -----------Route--------------------
    Key:api/spaceships
    Value:get all
    -----------Route--------------------
    -----------Route--------------------
    Key:api/spaceships/:id
    Value:get filtered list
    -----------Route--------------------
    -----------Next Iteration---------------------
    HTTP Method :post
    -----------Route--------------------
    Key:api/spaceships
    Value:get all
    -----------Route--------------------
    -----------Route--------------------
    Key:api/spaceships/:id
    Value:get filtered list
    -----------Route--------------------
    -----------Next Iteration---------------------

2017/12/29

Quick Start : MongoDb on Ubuntu 17.04

MongoDb Installation:

Install MongoDb (with super user)
    apt install  mongodb-server

Status of mongodb service
    systemctl status mongodb
    systemctl restart mongodb
        or
    service mongodb start
    service mongodb stop
    service mongodb status

Auto Start service
    systemctl enable mongodb

Version Check
    mongod --version

Configuration File:
    /etc/mongodb.conf

Getting Started with Mongo:

Start Mongo CLI:
  mongo

Insert JSON:
    db.mycollection.insertMany([
    {fname:"john",mname:"joe",lname:"doe",skill:["c#","javascript","sql"]},
    {fname:"mary",mname:"joe",lname:"doe",skill:["ccna","ccnp","cci","operation research"]},
    ])

View Inserted Json:
        db.mycollection.find({}).pretty();
    Output:
        {
            "_id" : ObjectId("5a4634cf26837e3337746881"),
            "fname" : "john",
            "mname" : "joe",
            "lname" : "doe",
            "skill" : [
                "c#",
                "javascript",
                "sql"
            ]
        }
        {
            "_id" : ObjectId("5a4634cf26837e3337746882"),
            "fname" : "mary",
            "mname" : "joe",
            "lname" : "doe",
            "skill" : [
                "ccna",
                "ccnp",
                "cci",
                "operation research"
            ]
        }
Filter Inserted Json on single property:
        db.mycollection.find({"fname":"john"}).pretty();
    Output:
        {
            "_id" : ObjectId("5a4634cf26837e3337746881"),
            "fname" : "john",
            "mname" : "joe",
            "lname" : "doe",
            "skill" : [
                "c#",
                "javascript",
                "sql"
            ]
        }

Filter with contains:
        db.mycollection.find({skill:{$in:["c#","ccna"]}})
    output:
        { "_id" : ObjectId("5a4634cf26837e3337746881"), "fname" : "john", "mname" : "joe", "lname" : "doe", "skill" : [ "c#", "javascript", "sql" ] }
        { "_id" : ObjectId("5a4634cf26837e3337746882"), "fname" : "mary", "mname" : "joe", "lname" : "doe", "skill" : [ "ccna", "ccnp", "cci", "operation research" ] }

Select few Property instead of all:
        db.mycollection.find({skill:{$in:["c#","ccna"]}},{fname:1,mname:1,lname:1})
    output:
        { "_id" : ObjectId("5a4634cf26837e3337746881"), "fname" : "john", "mname" : "joe", "lname" : "doe" }
        { "_id" : ObjectId("5a4634cf26837e3337746882"), "fname" : "mary", "mname" : "joe", "lname" : "doe" }

Quick Notes : Installing PgAdmin4 on ubuntu 17.04 as Service

On Ubuntu 17.04 Linux Terminal

Switch to Home Directory of non-super user
    cd $HOME

Install dependencies for python virtual environment

    sudo apt-get install virtualenv python-pip libpq-dev python-dev

Create Virtual environment
    virtualenv pgadmin4

Switch to base folder of virtual environment
    cd pgadmin4

Activate Virtual environment   
    source bin/activate

Download wheel for pgAdmin4
    wget https://ftp.postgresql.org/pub/pgadmin/pgadmin4/v2.0/pip/pgadmin4-2.0-py2.py3-none-any.wh

Install Wheel
    pip install pgadmin4-2.0-py2.py3-none-any.wh

Location of executable pgAdmin4.py is bit confusing,its in /usr/local/lib/python2.7/dist-packages/pgadmin4

running in Desktop Mode (optional):
  /usr/local/lib/python2.7/dist-packages/pgadmin4/config.py

    locate server setting section inside it there will be text as follows

        if builtins.SERVER_MODE is None:
            SERVER_MODE = True
        else:
            SERVER_MODE = builtins.SERVER_MODE

     just below it set
        SERVER_MODE = False

Now run pgAdmin4 as follows
    python /usr/local/lib/python2.7/dist-packages/pgadmin4/pgAdmin4.py

    it will ask for creating pgadmin4 username & password.

PgAdmin4 run on http://localhost:5050 where you can login using just provided login details.
Add your postgres server by right clicking on server new.

Creating service for PgAdmin4

create a file at /etc/systemd/system/pgadmin4.service

add following content into it,Here
/home/sangram/pgAdmin4/pgAdmin4 is path to my python virtual environment.

[Unit]
Description=Pgadmin4 Service
After=network.target

[Service]
User=sangram
Group=sangram
WorkingDirectory=/home/sangram/pgAdmin4/pgAdmin4
Environment="PATH=/home/sangram/pgAdmin4/pgAdmin4/bin"
ExecStart=
/usr/local/lib/python2.7/dist-packages/pgadmin4/pgAdmin4.py

PrivateTmp=true

[Install]
WantedBy=multi-user.target 


Now start newly created service as

        sudo systemctl start pgadmin4 

to make service autostart 

         sudo systemctl enable pgadmin4

you can check service status by 


         sudo systemctl status pgadmin4

Now we can check if localhost:5050/ for pgAdmin4.


2017/10/09

Node.js:Event Emitter

Many objects in a Node emit events for example, a net.Server emits an event each time a peer connects to it, an fs.readStream emits an event when the file is opened. All objects which emit events are the instances of events.EventEmitter.                
     
The event emitter allows us to decouple the producers and consumers of events using a standard interface.

EventEmitter class lies in the events module. EventEmitter provides multiple properties like on and emiton property is used to bind a function with the event and emit is used to fire an event.

var http = require("http");
var events = require('events');
var eventEmitter = new events.EventEmitter();

var serviceDownAlert = function(){
  console.log('The Ping Client --> xxx.xxx.xxx.xxx is not responding..');
}

//attach listener
eventEmitter.on('serviceDown', serviceDownAlert);

function pingClient(){
  var _host="35.185.129.118",
  _path="/isalive.html",_port="5432";
 
  httpGet(_host,_port,_path,function (err,res){
    console.log("Pinging..");
    console.log(res);
    if(res.statusCode.toString() != "200"){
      eventEmitter.emit('serviceDown');
    }
  });
}

function httpGet(host,port,path,callback){
  var options = {
    "method": "GET",
    "hostname": host,
    "port": port,
    "path": path,
    "headers": {
      "cache-control": "no-cache"
    }
  };
    var req = http.request(options, function (res) {
    var chunks = [];
    var result =
    res.on("data", function (chunk) {
      chunks.push(chunk);
    });
   
    res.on("end", function () {
      var body = Buffer.concat(chunks);
      result = {"response":body.toString(),"statusCode":res.statusCode};
      callback(null,result);
    });

    res.on('error', function (err) {
      result = {"response":null,"statusCode":res.statusCode};
      callback(err, result);
    });
  }).on('error', function(err) {
    result = {"response":null,"statusCode":"-1"};
    callback(err, result);
});
req.end();
}
//start ping client
pingClient();

Here a Ping-Client hits a server URL and expects HTTP 200 status code in response, if it doesn’t receives 200 http status code it emits “serviceDown” event.
serviceDownAlert” function is registered as event listener, after “serviceDown” event is emitted listeners get called.

We can attach multiple event listener functions to a single event even a anonymous function can also be attached as listener function to an event.
Anonymous function as Event Listener:

eventEmitter.on('serviceDown', function()
{
    console.log('Anonymous Fuction as Event Listener:: The Ping Client --> xxx.xxx.xxx.xxx is not responding..');
}

Methods of EventEmitter class:
1.       emitter.addListener(event, listener):Adds a listener to the end of the listeners array for the specified event. No checks are made to see if the listener has already been added.

2.       emitter.on(event, listener):Adds a listener to the end of the listeners array for the specified event. No checks are made to see if the listener has already been added. It can also be called as an alias of emitter.addListener()

3.       emitter.once(event, listener):Adds a one time listener for the event. This listener is invoked only the next time the event is fired, after which it is removed.

4.       emitter.removeListener(event, listener):Removes a listener from the listener array for the specified event. Caution: changes array indices in the listener array behind the listener.

5.       emitter.removeAllListeners([event]):Removes all listeners, or those of the specified event.

6.       emitter.setMaxListeners(n):By default EventEmitters will print a warning if more than 10 listeners are added for a particular event.

7.       emitter.getMaxListeners():Returns the current maximum listener value for the emitter which is either set by emitter.setMaxListeners(n) or defaults to EventEmitter.defaultMaxListeners.

8.       emitter.listeners(event):Returns a copy of the array of listeners for the specified event.

9.       emitter.emit(event[, arg1][, arg2][, ...]):Raise the specified events with the supplied arguments.

10.    emitter.listenerCount(type): Returns the number of listeners listening to the type of event.

References        


2017/10/08

Event Loop overview

The Event Loop is a programming construct that waits for & dispatches events  in a program.
Event is usually defined as significant change in state of an object.

Node.js is a JavaScript runtime built on Chrome's V8 JavaScript engine. Node.js uses an event-driven, non-blocking I/O model.

Event Loop lies at the heart of Node.js that is responsible for making it event driven (asynchronous).

Event Loop overview:

In most of the modern operating systems, system kernels are multi-threaded, they are capable of handling multiple operations executing in the background.Node.js tries to capitalize on OS infrastructure.
Whenever a task arrives for execution with node.js it gets queued, task gets pulled for execution from this queue sequentially. Event loop checks if current task requires any Blocking IO Operations or may demands more time for complex computation tasks embedded in it.
 If it does not require blocking IO or complex computation then Event Loop will process all steps demanded in that task & serve response.
If task requires very complex computation or Blocking IO, Even Loop does not process it, but offloads the operations to the system kernel directly using asynchronous interfaces provided by operating system or by using internal thread pool that communicate with OS which are not providing such asynchronous API also add this offloaded task for listening for update of status (such change of state usually referred as an event) via event listeners.
 Rather than idle waiting for offloaded task to complete it moves on to new task in queue. Meanwhile when offloaded task finishes and Event Loop comes to know about it through listeners, now EventLoop starts executing this task from where it left after finishing tasks in hand it.
To understand EventLoop in more details let’s look at event loop phases.

Phases of Event Loop:                                                                                                                Event loop goes through its phases in cyclic manner. Each phase has own FIFO callback queue also called Event queue. Callbacks are event in themselves. When the event loop enters a given phase, it performs any operations specific to that phase, then execute callbacks in that phase's queue until the queue has been exhausted or the maximum number of callbacks has executed.

Event loop has following phases

             1)     timers: this phase executes callbacks scheduled by setTimeout() and setInterval().
2)     I/O callbacks: executes almost all callbacks with the exception of close callbacks, the ones scheduled by timers, and setImmediate().
3)     idle, prepare: only used internally.
4)     poll: retrieve new I/O events; node will block here when appropriate.
5)     checksetImmediate() callbacks are invoked here.
6)     close callbacks: e.g. socket.on(‘close’ ...).

Suppose EventLoop is inside poll phase & at the same time system kernel adds more callbacks into poll callback queue then poll phase has to run much longer than a timer's threshold

Event Loop Phases details:

I/O callbacks Phase: I/O callbacks executes callbacks for some system operations such as types of TCP errors e.g. ECONNREFUSED for *nix systems which requires wait to report the error.
Poll Phase: Poll phase Executes scripts for timers whose threshold has elapsed, then Processes events in the poll queue.
If there are no timers scheduled and poll queue is not empty event loop will iterate through its queue of callbacks executing them synchronously until either the queue has been exhausted, or the system-dependent hard limit is reached.
For empty poll queue If scripts have been scheduled by setImmediate(), the event loop will end the poll phase and continue to the check phase to execute those scheduled scripts rather than waiting.
 But If scripts have not been scheduled by setImmediate(), the event loop will wait for callbacks to be added to the queue, then execute them immediately.
Check phase: This phase allows a person to execute callbacks immediately after the poll phase has completed. Runs all callbacks registered via setImmediate().
close callbacks phase: If a socket or handle is closed abruptly (e.g. socket.destroy ()), the 'close' event will be emitted in this phase. Otherwise it will be emitted via process.nextTick().


Event loop's order of operations:


Event Loop is a single threaded and semi-infinite loop. The reason why this is called a semi-infinite loop is because this actually quits at some point when there is no more work to be done.
What is process.nextTick ()?

In Node.js, each iteration of an Event Loop is called a tick. process.nextTick() get processed after the current operation completes regardless of the current phase of the event loop.

Suppose if the event loop is in Timer phase and there were 5 callbacks in the timer queue already; and event loop is busy executing the third one. By that time if few process.nextTick() callbacks are pushed to nextTickQueue, the event loop will execute all of them synchronously after completing the current callback execution (which is 3rd one) and will resume the Timer callback execution again from the 4th callback.

Consider following code snippet

function callback(){
    console.log('wrapped inside nexttick');
  }
  process.nextTick(callback);
  console.log('task1');
  console.log('task2');


Output of this snippet is as follows

C:\Users\Sangram\Desktop>node test.js
task1
task2
wrapped inside nexttick
console.log associated with function callback() get called after task of printing task1 & task2 as task of printing task1 & task2.  

process.nextTick() is technically not a part of the event loop.
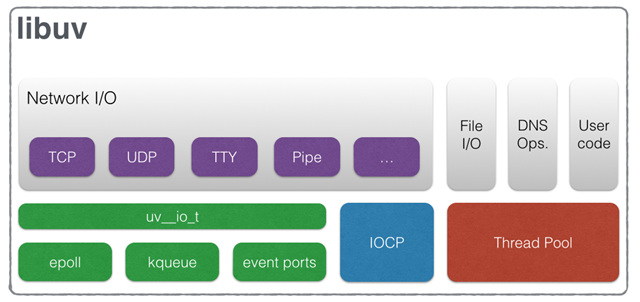
What is Libuv?

Node.js consumes the low-level non-blocking, asynchronous hardware I/O functionalities provided by Operating System implementations. epoll in Linux, kqueue in BSD systems (MacOS), event ports in Solaris, IOCP (Input Output Completion Port) in Windows. Not all the types of I/O can be performed using these implementations. Even on the same OS platform, there are complexities in supporting different types of I/O. Certain systems, such as Linux does not support complete asynchrony for file system access. And there are limitations in file system event notifications/signaling with kqueue in MacOS systems.

    NodeJS DNS functions such as dns.lookupaccesses system configuration files such as nsswitch.conf,resolv.conf and /etc/hosts , file system complexities described above are also applicable to dns.resolve function.

Therefore, a thread pool has been introduced to support I/O functions which cannot be directly addressed by hardware asynchronous I/O utils such as epoll/kqueue/event ports or IOCP. Now we know that not all the I/O functions happen in the thread pool.Some I/O get performed using native hardware implementations while preserving complete asynchrony, and there are certain I/O types which should be performed in the thread pool so that the asynchronous nature can be guaranteed.
To govern this entire process while supporting cross-platform I/O, there should be an abstraction layer which encapsulates these inter-platform and intra-platform complexities and expose a generalized API for the upper layers of Node. Libuv is that abstraction layer.
libuv is cross-platform support library which was originally written for NodeJS. It’s designed around the event-driven asynchronous I/O model.

The library provides much more than a simple abstraction over different I/O polling mechanisms: ‘handles’ and ‘streams’ provide a high level abstraction for sockets and other entities; cross-platform file I/O and threading functionality is also provided, amongst other things.

Below diagram summarizes libuv stack w.r.t. Operating system IO library .


.
Reference